Series Part 3 Cloud-to-OnPrem Kubernetes Migration
Author: Elmehdi Diab | DevOps Engineer | K8s Migration Lab
Reading Time: ~4 minutes
Why Rook-Ceph for Kubernetes Storage? 
When running Kubernetes on-premise, you lose the luxury of cloud-provider storage classes like AWS EBS or GCP Persistent Disks. You need a storage solution that’s:
- Distributed: Data survives node failures
- Self-healing: Automatic rebalancing when disks fail
- Kubernetes-native: Managed via CRDs, not manual commands
- Flexible: Block, file, and object storage from one platform
Rook-Ceph delivers all of this by running Ceph as a Kubernetes operator.
What You Get: Block storage (RBD) for databases, shared filesystem (CephFS) for multi-pod access, and S3-compatible object storage (RGW) — all from a single deployment.
| Storage Type | Use Case | Access Mode |
|---|---|---|
| RBD (Block) | Databases, single-pod workloads | ReadWriteOnce (RWO) |
| CephFS (File) | Shared storage, CMS, logs | ReadWriteMany (RWX) |
| RGW (Object) | Backups, artifacts, media | S3 API |
Prerequisites
Before installing Rook-Ceph, ensure you have:
- A running Kubernetes cluster (we’re using Talos from Part 2)
- Raw, unformatted disks on each worker node (Ceph manages them directly)
- At least 3 nodes for proper replication (recommended)
- Helm 3.x installed on your local machine
Installation
Creating a Ceph cluster with Rook requires two steps: first install the Rook Operator, then deploy the Ceph Cluster.
1 Install the Rook Operator
The operator manages Ceph lifecycle within Kubernetes.
# Add Rook Helm repository
helm repo add rook-release https://charts.rook.io/release
helm repo update
# Install the operator
helm install --create-namespace --namespace rook-ceph rook-ceph rook-release/rook-ceph --set crds.enabled=true
Verify the operator is running:
kubectl --namespace rook-ceph get pods -l "app=rook-ceph-operator"Verify CRDs are installed:
kubectl get crd | grep ceph2 Configure PodSecurity Labels
Default PodSecurity policies prevent privileged pods from running. Ceph requires elevated permissions:
kubectl label ns rook-ceph pod-security.kubernetes.io/enforce=privileged --overwrite
kubectl label ns rook-ceph pod-security.kubernetes.io/audit=privileged --overwrite
kubectl label ns rook-ceph pod-security.kubernetes.io/warn=privileged --overwrite
Why Privileged? Ceph OSDs need direct access to block devices and kernel modules for optimal performance. This is standard for storage systems running in containers.
3 Prepare Disks on Worker Nodes
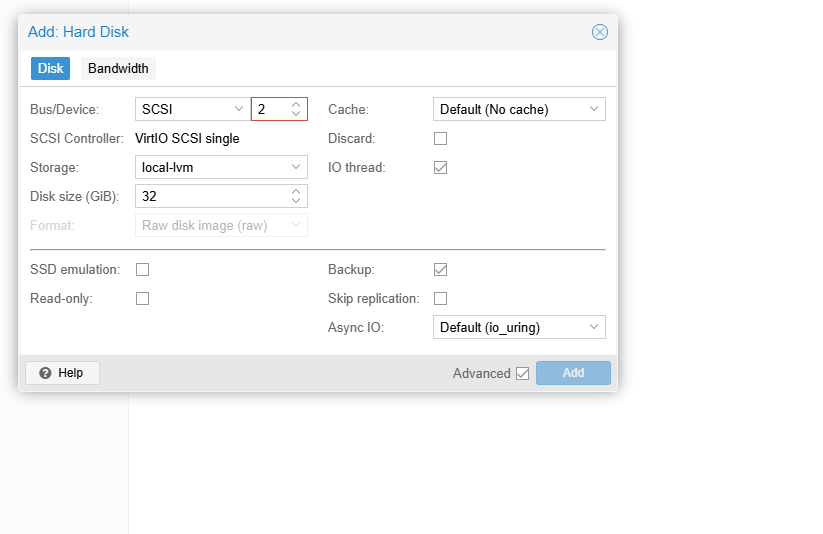
Add a dedicated disk to each worker node in Proxmox (or your hypervisor), then wipe them to ensure they’re clean for Ceph:
# Wipe disks on each worker (adjust IPs for your environment)
talosctl -n 194.36.139.211 wipe disk sdb # worker-1
talosctl -n 194.36.139.212 wipe disk sdb # worker-2
talosctl -n 194.36.139.213 wipe disk sdb # worker-3 Important: Ceph requires raw, unpartitioned disks. Any existing partitions or filesystem signatures will prevent OSD creation.
4 Install the Ceph Cluster
helm install --create-namespace --namespace rook-ceph \
  rook-ceph-cluster rook-release/rook-ceph-cluster \
  --set operatorNamespace=rook-ceph
Optional: Extract default values for customization:
helm show values rook-release/rook-ceph-cluster > values-override.yamlPatience Required: Ceph cluster initialization takes 15-30 minutes depending on disk size and network speed. The OSDs need to sync, and the monitors need to establish quorum.
5 Monitor Cluster Status
# Watch cluster status (Ctrl+C to exit)
watch kubectl --namespace rook-ceph get cephcluster rook-ceph
# Check operator logs for issueskubectl -n rook-ceph logs -l app=rook-ceph-operator --tail=50
When ready, verify storage classes are available:
kubectl --namespace rook-ceph get cephcluster rook-ceph
kubectl get storageclass
Success! You should see storage classes like ceph-block, ceph-filesystem, and ceph-bucket available for your workloads.
Verification with Rook Toolbox
The Rook Toolbox provides a pod with Ceph CLI tools for verification and troubleshooting.
Deploy the Toolbox
# Launch toolbox pod
kubectl apply -f https://raw.githubusercontent.com/rook/rook/v1.18.5/deploy/examples/toolbox.yaml
# Wait for it to be ready
kubectl -n rook-ceph rollout status deploy/rook-ceph-tools
Connect and Run Diagnostics
# Enter the toolbox
kubectl -n rook-ceph exec -it deploy/rook-ceph-tools -- bash
# Inside the toolbox, run these commands:
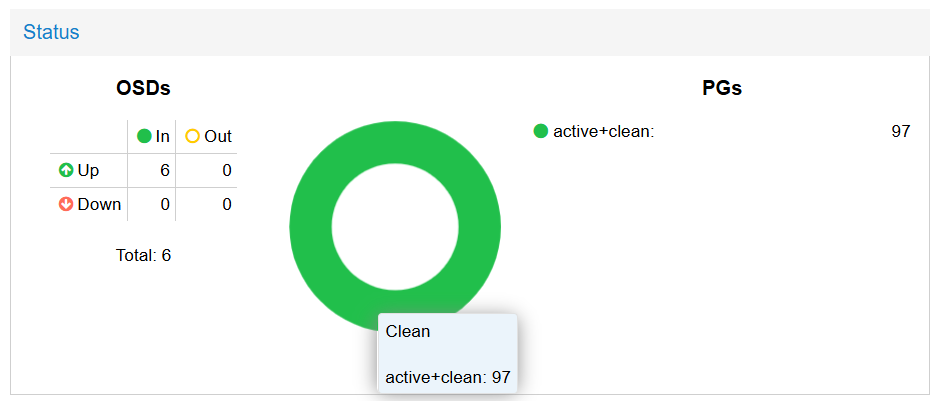
ceph status # Overall cluster health
ceph osd status # OSD (disk) status
ceph df # Storage utilization
rados df # Pool-level statistics
| Command | What It Shows |
|---|---|
ceph status | Cluster health, monitor quorum, OSD count |
ceph osd status | Status of each OSD (up/down, in/out) |
ceph osd tree | Hierarchical view of OSDs by host |
ceph df | Overall and per-pool storage usage |
rados df | Detailed pool statistics |
Operations & Maintenance
Resizing Disks
If you resize disks in your hypervisor, you need to restart the OSDs to pick up the new capacity:
kubectl -n rook-ceph delete pod -l app=rook-ceph-osdThe operator will automatically recreate the pods and detect the new disk size.
Cleaning Up (Complete Teardown)
Warning: This process permanently destroys all data in the Ceph cluster. Only proceed if you’re certain you want to remove everything.
Step-by-Step Teardown
1 Signal cluster destruction:
kubectl --namespace rook-ceph patch cephcluster rook-ceph \
  --type merge \
  -p '{"spec":{"cleanupPolicy":{"confirmation":"yes-really-destroy-data"}}}'
2 Delete storage classes:
kubectl delete storageclasses ceph-block ceph-bucket ceph-filesystem
3 Delete Ceph resources:
kubectl --namespace rook-ceph delete cephblockpools ceph-blockpool
kubectl --namespace rook-ceph delete cephobjectstore ceph-objectstore
kubectl --namespace rook-ceph delete cephfilesystem ceph-filesystem
4 Delete cluster and Helm releases:
kubectl --namespace rook-ceph delete cephcluster rook-ceph
helm --namespace rook-ceph uninstall rook-ceph-cluster
helm --namespace rook-ceph uninstall rook-ceph
Troubleshooting Quick Reference
| Issue | Solution |
|---|---|
| OSDs not starting | Check disks are wiped clean: talosctl wipe disk <device> |
Cluster stuck in HEALTH_WARN | Check ceph health detail in toolbox for specific warnings |
Pods stuck in Pending | Verify PodSecurity labels are applied to rook-ceph namespace |
| No storage classes appear | Wait for cluster to reach HEALTH_OK; check operator logs |
PVCs stuck in Pending | Verify the storage class exists and OSDs are running |
What’s Next?
With Rook-Ceph providing distributed storage, your on-prem Kubernetes cluster now has:
- Immutable OS with Talos
- Highly available control plane
- Production-grade distributed storage
Next up in the series:
- Part 4: Cilium networking and eBPF-powered security policies
- Part 5: Velero + Kopia backup automation
References
Questions about Ceph configuration or running into issues? Drop a comment or DM me on LinkedIn. Happy learning!